Access Denied
IMPORTANT! If you’re a store owner, please make sure you have Customer accounts enabled in your Store Admin, as you have customer based locks set up with EasyLockdown app. Enable Customer Accounts

1
/
of
2
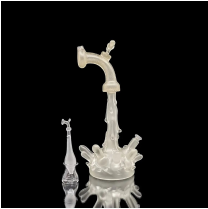
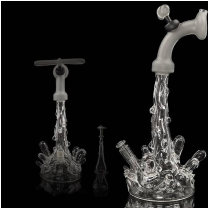
Dynavap OmniVap XL Titanium
Dynavap OmniVap XL Titanium
All DynaVap vapourisers utilise an external heat source instead of relying on an internal battery. Simply fill and heat the cap of your DynaVap with a jet lighter/torch, wait for the click and inhale pure combustion free vapour.
The OmniVap XL Titanium is the larger 109mm version of the OmniVap Titanium. Like its little sister, it includes the Titanium Tip, Cap, Omni Mouthpiece and Condenser Assembly and a 45mm Omni Titanium Body. Apart from the stainless steel cap, the OmniVap is made entirely of titanium and does not get hot even after prolonged use (except for vaporization chamber and titanium tip).
The Omni system has a specialised design to allow for simple adjustment of flow restriction, allowing complete control of the vapour-to-air intake ratio. Adjust by simply twisting the mouthpiece, which extends/retracts the condenser into the back end of the tip. It is not compatible with the M Tip or stem midsections.
**Vapcap comes packaged in complimentary storage tube to protect during transit**
To use your VapCap:
- Most Important! Before your first use, please read all of these instructions and then do at least two, preferably more than two, dry runs with nothing in the VapCap! This is very important to become familiar with the operation of the unit and prevent unintentional combustion residues.
- The VapCap is unlike any other vapourizer, so give it a few tries empty to get the feel of its unique temperature-indicating click. Heat the VapCap in a quiet area, listen and feel so you know what you are looking for. If you are using a torch lighter, this should not take more than 5 or 6 seconds. Heat the middle of the cap not the end and rotate while heating. If more than 6 seconds go by and you don’t hear the click, stop heating and let it cool down.
- If you severely overheat your VapCap it can be permanently damaged. It is very important you hear the cool down click, or allow it to cool to the touch, before heating for the next cycle. Repeat this procedure several times to get the feel of how this little unit operates.
- When you are ready for the first use, let it cool down, then remove the cap from the VapCap.
- Fill the VapCap chamber with your material of choice. This can be done easily by pushing the VapCap into a container of your material and twisting. Pre-grinding your material is NOT needed like when using a bat or hitter. If you prefer to grind, go coarse. Finely ground material will get through the diffuser disc and into the unit.
- Place the cap back on the VapCap.
- Heat up the metal cap of your VapCap while rotating it, with the flame or heat source applied to the last third of the metal cap. Try to only apply heat to the side of the cap and NOT the end. This is not like lighting a smoking device.
- Continue rotating and heating the cap until you hear and or feel a click - this means the VapCap is ready!
- Puff on the mouthpiece. Experiment a little here. If you draw with the air hole completely plugged the flow will seem somewhat restricted. This is normal. Some find they get the best result by taking a long, slow steady draw with the hole completely open, and others will intermittently or lightly cover the air/vapor mix port. The way air flows through the VapCap cools the vapor to provide a smooth experience.
- Keep drawing as desired until you hear the click again, this means the VapCap has cooled down.
- When the vapor production diminishes, it is easy to reactivate. a. Make sure the VapCap has re-clicked “to cool” before reheating for the next cycle. b. If you are not sure if it has re-clicked, gently blow on the end to cool it. It may take up to 1 minute to reset.
- When there is no longer any desirable vapor produced, and the cap has clicked “to cool”, remove the cap. The consumed material can be either blown out the end, or the little tang on the cap is also a wonderful “digger outer.”
- Reload for another round of simple and wonderful vapor.
Tips:
- It is recommended that you use a butane torch style lighter with your VapCap.
- Wait until you hear or feel the reset click or at least 30 seconds after the VapCap stops producing vapor to reheat.
- It is VERY important to wait until you hear the cool down click before applying more heat.
- Stop heating your VapCap as soon as you hear the click until you get to know each other better.
- You can vary the intensity of the flavor by using the air/vapor adjustment port.
- Depending on your personal preference and heat source, as well as how many cycles since the VapCap was loaded, you may want to apply heat for 1-2 seconds after the click. This will provide for a different level of roasted flavor.
- DO NOT APPLY HEAT FOR MORE THAN 3 SECONDS PAST THE CLICK! OVERHEATING WILL PERMANENTLY DAMAGE THE VAPCAP!
- The end of the VapCap gets very hot during and following use. Do not touch the hot end until it has cooled. Also please do not put the hot end into your mouth.
- The VapCap can be safely put back in its Special Case or reloaded after the cool down click is heard.
Regular price
$289.95
Regular price
Sale price
$289.95
Unit price
/
per
Tax included.
Couldn't load pickup availability

JOIN THE HIGH END SOCIETY
If you're a big-time enthusiast of high-end glass, you'll love our exclusive 'High End Society'! We offer members of the 'High End Society' access to our limited access mailing list. This list offers special quarterly discounts on online items from our store, as well as early access to our latest and greatest high-end glass. If you've always wanted to be ahead of the curve when it comes to our brand new glass drops, you're in for a treat!
LEARN MORESign up for 5% off on your first order!
Join our newsletter to receive exclusive offers, stay in the loop, and be the first to know when new products drop.

Invalid password
Enter
- Choosing a selection results in a full page refresh.